The Plan Summary Page
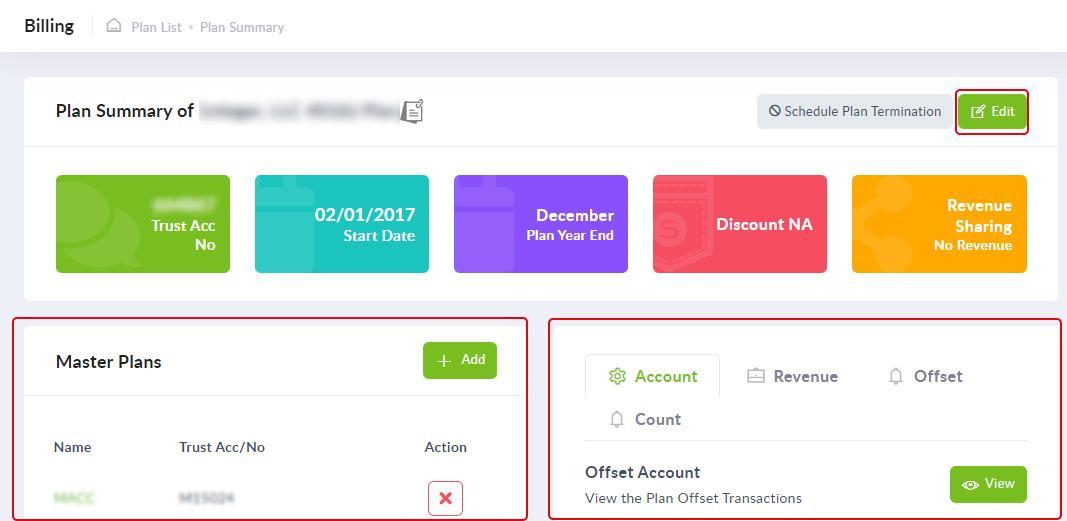
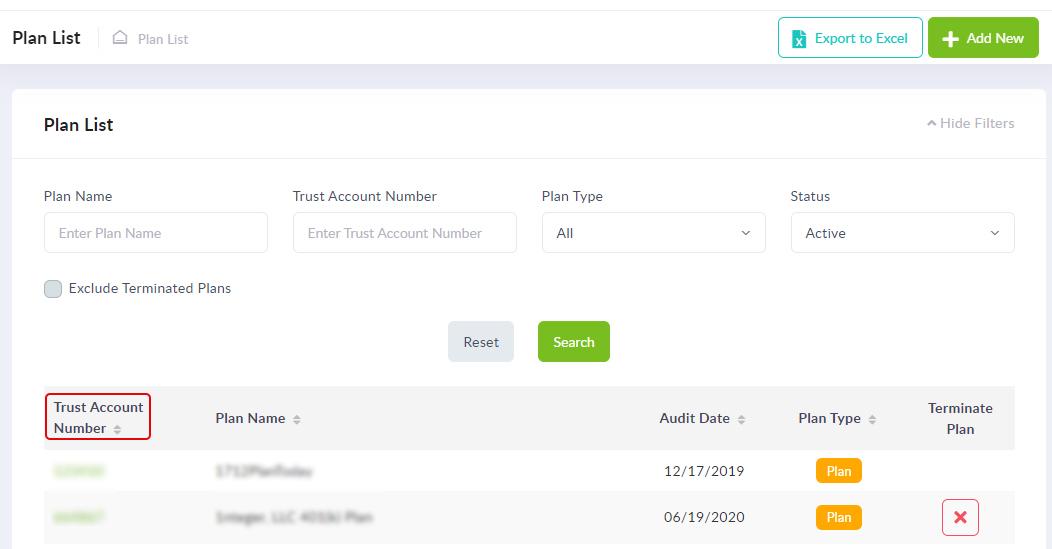
To access the Plan Summary Page, click on the “Trust Account Number” of the Plan from the “Plan List” page. This takes you to the Plan Summary page of that Plan. The “Plan Summary” page accessed from the “Plan List” page, has the following features,
Edit a Plan
Link and Unlink a Plan and a Master Plan
The Plan Snapshot section
The Fee Scheduling section
The Fee Minimum and Maximum listing section
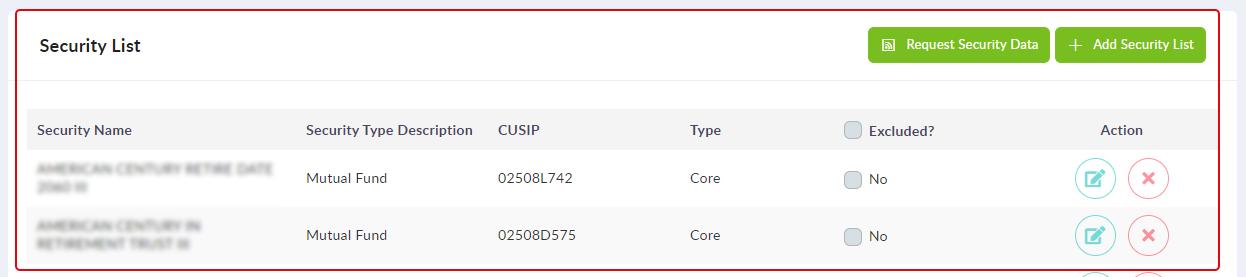
The Security List (only in Plans) section
Editing a Master Plan or Plan
To edit a Master Plan or Plan, on the “Plan List” page, click on the “Trust Account Number” of the Plan to go to its “Plan Summary” page.
Now, on the “Plan Summary” page, click on the “Edit” button (right top corner) to edit the Plan details.
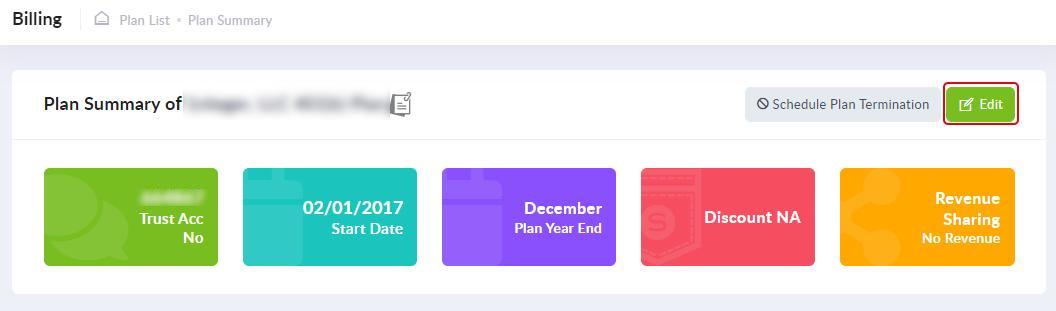
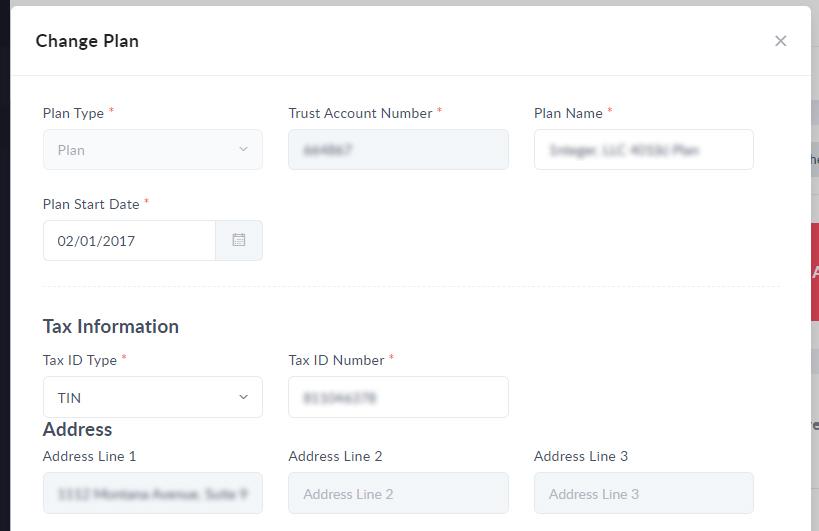
This will bring up the “Change Plan” popup window of the chosen Master Plan / Plan, in which you can make the necessary updates.
The following fields cannot be edited - “Plan Type”, “Trust Account Number”, “Plan Start Date”, all fields in the “Address” section, the fields, “Product Line”, “Source of Business”, “IPM Indicator”, “Forfeiture Code”, “Branch” and “Account Type” in the “Plan Information” section.
Edits to a Master Plan / Plan can be done in the following fields,
Field Name |
Details to Enter |
Plan Name |
You can make modifications to the name of the Plan in this field. |
Plan Termination Date |
You can modify or add the termination date for the Plan here. |
Annual Fee Date |
To modify the month in which the annual fee of the plan ends, choose a month from the drop-down list. So, for example if the month chosen is January, the end date of month is taken, which is the 31st. |
Revenue Sharing |
The revenue available in a Plan can be allocated to participants, used to offset fees or can be disabled in the billing. The Revenue Sharing feature has three options - “Allocated To”, “Offset Plan Fees”, “No Revenue”.
|
Discount Rate |
You can add or modify the discount rate for the plan here. The Discount Rate will apply to all Fee Schedules for the Plan unless an overriding discount is applied at a Fee level. Note: The “%” symbol need not be entered along with the value. If a 2% discount is to be applied, it can be entered as 2, or if it should be a 5.5% discount, it can be entered as 5.5. |
Discount Expiration Date |
If you have set a discount for the plan and want to set or modify an expiration date, you can do it here. Note: The Discount Expiration Date should always be a date after the Plan Start Date. |
Tax ID Type |
Choose from the dropdown list if the Tax ID Type is TIN or SSN. This is an optional field. |
Tax ID Number |
Any changes to or inclusion of the 9 digit all numeric TIN or SSN can be done in this field. This is an optional field. |
Broker / Dealer |
You can enter the name of the broker or dealer in this field. This is an optional field. |
Broker Branch |
You can enter the broker branch name here. This is an optional field. |
Representative |
You can enter the representative name here. This is an optional field. |
Stock Indicator |
Check the checkbox if you want to display the stock indicator. |
Memo |
The memo description entered here is shown in the Payment Statement under the Commission Details section. |
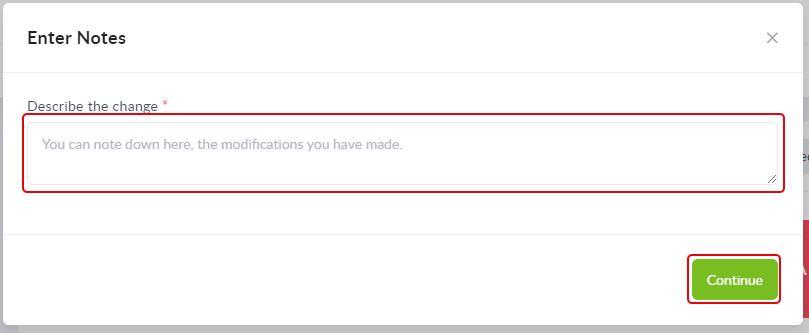
Once all details are entered click on the “Update” button to save the details. You get the “Enter Notes” popup window, where you can enter the details of the modifications made to the Plan and in the “Change Effective Date” field select the date from which the changes you made gets reflected. Once done, click on the “Continue” button.
Note: The “Plan Start Date” that was non-editable in the “Change Plan” popup window, can be modified in the “Enter Notes” popup window only if discount is edited.
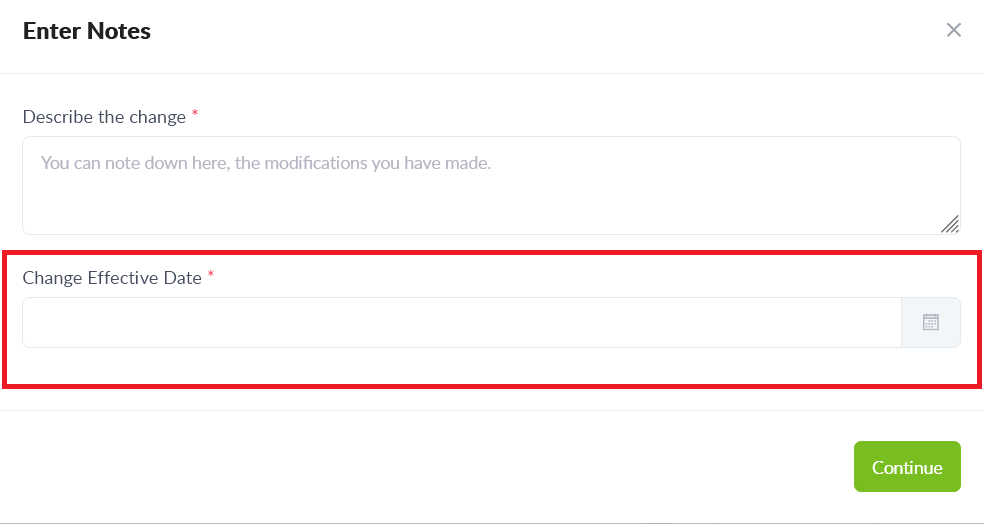
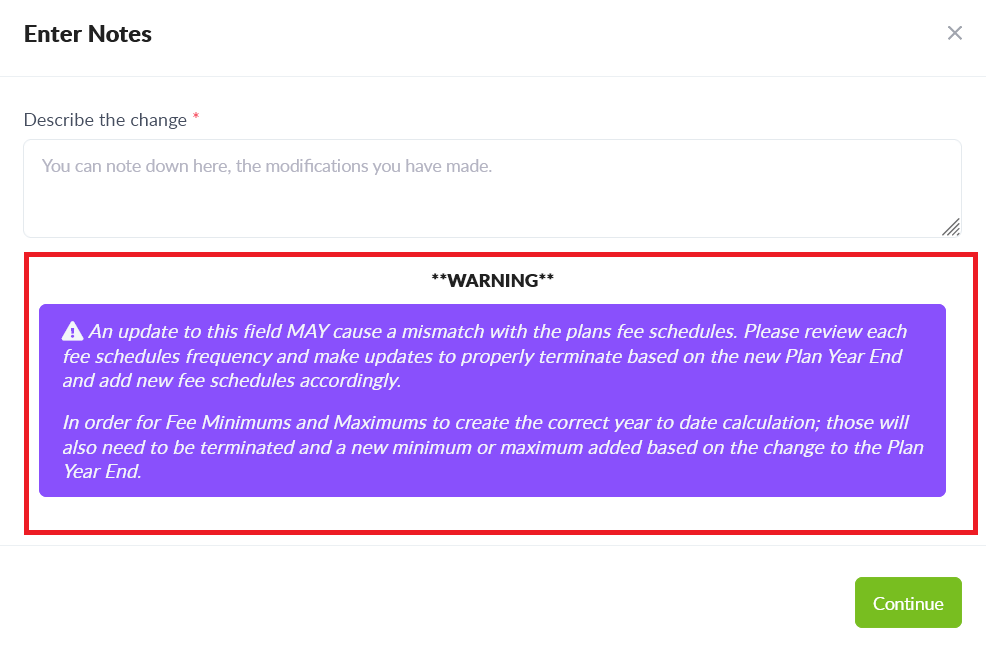
Note: On updating plan year end will trigger a warning message on the notes pop up
If there were no previously created transactions, you get a popup window with the message “No impacted transactions found”. You can click on the “Save and Continue” button.

Alternatively, if there were previously created transactions, you get a popup window with the message “The following transactions will be cancelled”. The popup window lists all the transactions that will be affected with this Fee re-run. To accept and continue, check the “I understand” check box and click on the “Re-run the Above Transactions” button.
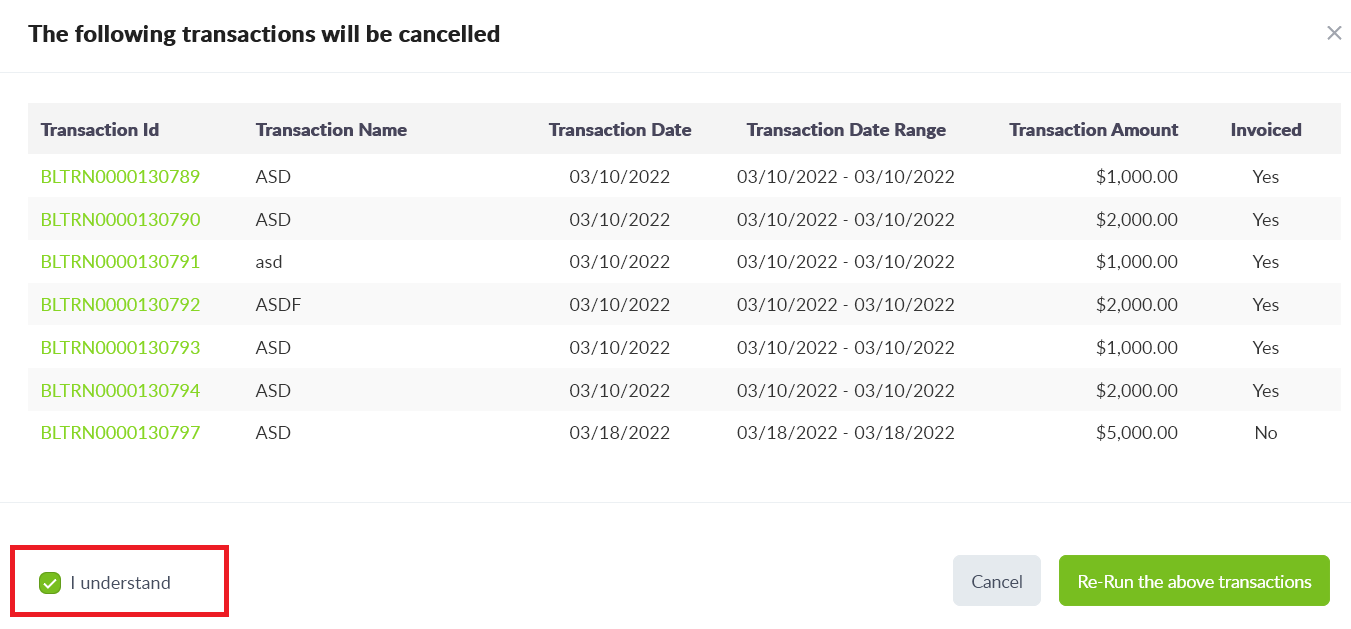
This cancels the earlier uninvoiced transactions and generates new uninvoiced transactions with the adjustments in payments made, and for any invoiced transactions, a debit transaction is created for the invoiced transaction amount and the transaction is recreated to reflect the adjustments.
Note: Important Information to Note Before Editing a Plan
When modifying an existing Plan, note that this will affect all the existing Fees configured under the Plan.
The impactful changes these modifications make are;
It affects the billing cycle.
On the Ad Hoc Fees and Scheduled Fees that have been run it affects the following;
- Uninvoiced Transactions - Cancels the transactions and creates new
ones with the adjustments made to the payments.
- Invoiced Transactions - A debit transaction is created for the
invoiced transaction amount and the transaction is recreated to reflect any additional payments. Say an invoice (INV00000..) has a transaction (BLTRN000..) for $(+)60.00. After the Plan is modified the new transaction amount is $62.00, which needs to be corrected on the invoice. The existing invoice stays untouched while a new transaction for $(-)60.00 (to nullify the above) is created. Both $(-)60.00 and $(+)62.00 are included in the next invoice so that in effect the Interested Party pays $60.00 from the old invoice and $2.00 from the new invoice.
Linking and Unlinking a Plan and a Master Plan
Linking a Plan and a Master Plan
You can add a Plan to a Master Plan or a Master Plan to a Plan only after both the “Master Plan” and the “Plan” has been created. Go to the “Plan Summary Page” by clicking on the “Trust Account Number” of the Plan. On the Plan Summary page, click on the “Add” button listed under the “Plans/Master Plans” section.
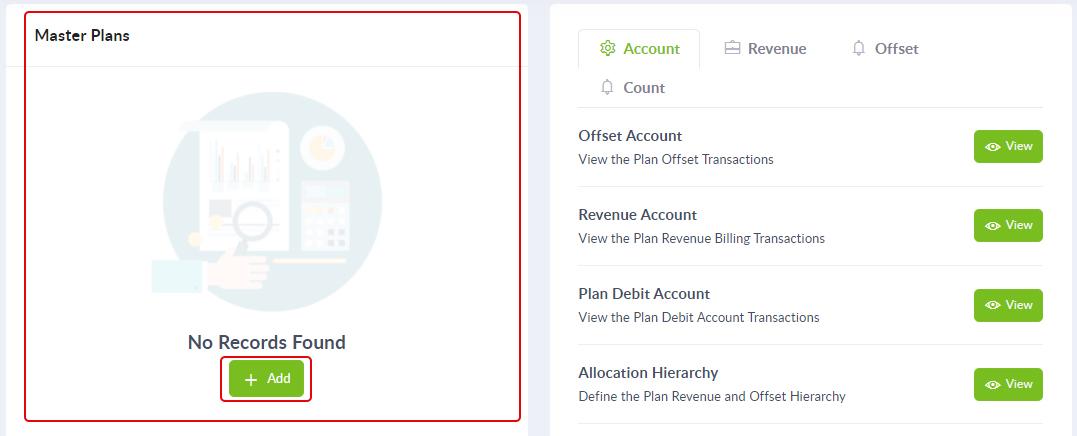
This brings up the “Add Plan” popup window, where you can add one or more Plans to the Master Plan.
To add a Plan to a Master Plan or vice versa, select the Plan to be added (type in the first letter of the Plan to list the Plans in the drop-down list) and click on the “Save” button.
If you want to add more than one Plan, select the Plan to be added and then click on the “+” button to add the next Plan and follow the same process you did for adding the first Plan. Once done click on the “Save” button.
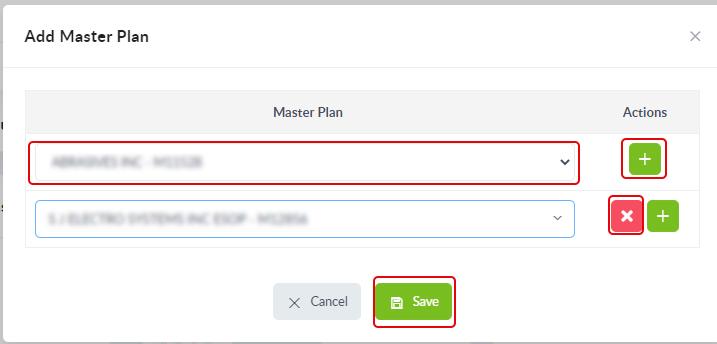
Note: To delete a Plan you added while on the Add Plan popup window,
just click on the  icon.
icon.
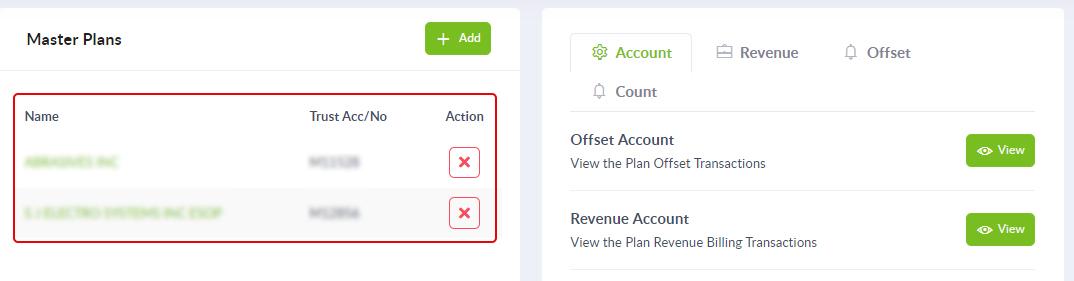
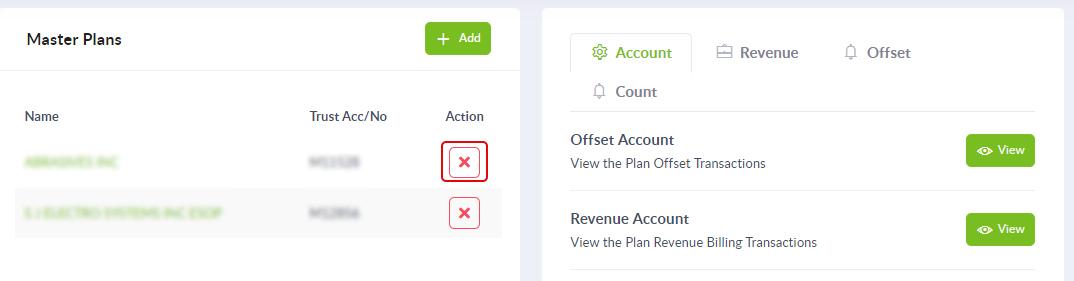
Once saved, all linked Plans get listed under the “Plans” section of the “Plan Summary” window.
Unlinking a Plan and a Master Plan
To unlink a Plan from a Master Plan, on the Plan Summary Page, under the Plans section, click on the “X” icon against the Plan you want to unlink.
Note: This function does not delete the Plan, all it does is unlink the Plan from the Master Plan and it will no longer be listed under that Master Plan.
The Plan Snapshot
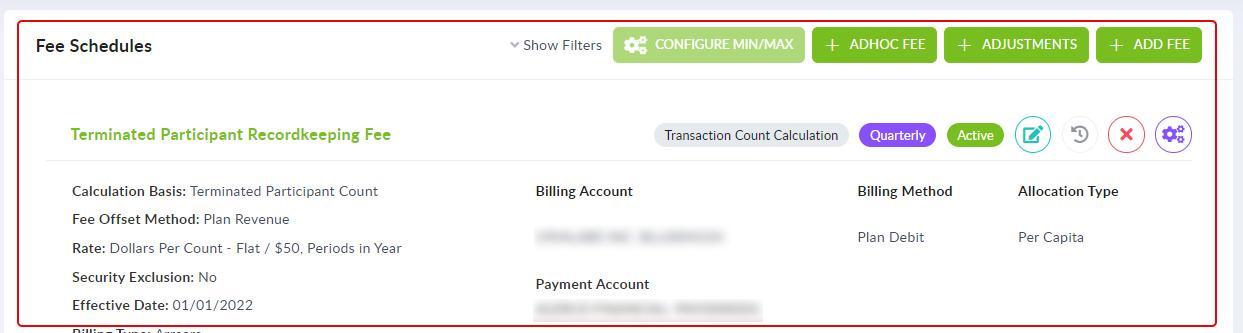
Fee Scheduling
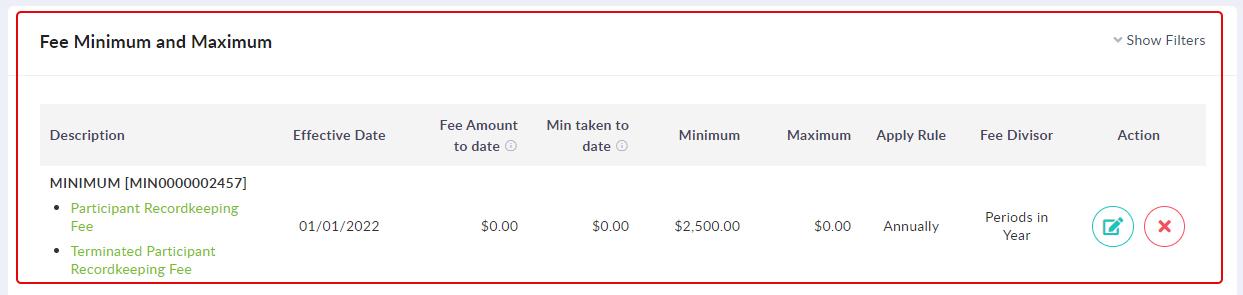
Fee Minimum and Maximum Listing
This section lists the fees that have the Fee Min and Max rule defined. Refer, “The Fee Minimum and Maximum Section (Plan Summary Page)”